Did you miss the good old “walkie-talkies”? The old-timers of vaping Geekvape decided to simultaneously please fans of dual-battery box mods, sub-tank tanks and rugged devices of the Aegis series by releasing the L200 Classic Kit.
Packaging Geekvape L200 Classic Kit
The weight and dimensions of the package will immediately give you an unambiguous hint that there is something large and heavy inside. And the inscriptions and images on the front side will clearly tell you what exactly it is. Here you can see the manufacturer’s logo, the name and the setup itself in the exact color that is inside. e-cigarettes online boutique in australia On the back you can find a list of the main characteristics and kit, as well as the usual sticker with a QR code and verification of originality. Hidden under the black and orange drain is a black box made of thick cardboard with an almost imperceptibly embossed Geekvape logo.
The first thing that greets us under the lid is the most desirable thing inside – the Aegis battery pack. Everything else needs to be scooped out from the bottom of the box.
Geekvape L200 Classic Kit Package Contents
Battery pack L200 Classic
Z Max Tank Atomizer (with 6.0 ml flask)
Evaporator Removal Tool
Package with extras
Replacement flask (4.0 ml)
USB Type-C cable
Geekvape M Series Coil: 0.14Ω 60-80W (installed), 0.2Ω 70-85W (spare)
Adapters for using 18650 batteries (2 pcs.)
In addition to the instructions and other waste paper in the form of a warning card and a warranty card, under the mod there is a complete Z Max Tank with an installed evaporator and another smaller box.
The assembler managed to stuff everything else tightly and compactly into it. The only complaint is that among the kit I did not find a proprietary “grip” for removing the evaporators. For some reason, Geekvape has tricked me for the second time and it’s not included in the kit. I hope that the sets that go on sale will still include this tool, because it is far from useless.
Appearance and design of Geekvape L200 Classic Kit
Give me back my 2007, 2018! Before us is almost the same two-battery Aegis Legend, which replaced the single-battery Aegis and later became a real hit among fans of big clouds. Back then, for many vapers it was a cherished dream to get this device in their hands, and it was cheerfully swept off the shelves. Even despite the controversial “moisture resistance” and rubberized casing, which lost its appearance after removing the device from the box in just a couple of minutes. Dust, debris, fingerprints – any Aegis attracted all this to its rubber coating like a powerful magnet. The new device used a different coating, which was no longer as easily soiled as it was before.
The setup lies in your hand… roughly like a brick. No, of course, the shape has become more rounded and truly ergonomic, the body itself is pleasant due to the rubberized coating (this is not some kind of soft-touch, this is a thick material that springs under the fingers!), but this whole bandura weighs obscenely a lot . The pockets of light summer clothes are not suitable for the device, and even in a winter jacket you will always feel that you have the L200 Classic with you. And someone may even be warped from the extra 400 g of such a load. In general, the best use case is a table or a backpack.
Dimensions L200 Classic: 64 * 32.5 * 96 mm
Weight:
Z Max Tank (without liquid and evaporator): 70 g
L200 Classic: 206 g
L200 Classic Mod with two 21700: 339 g
Mod with tank and two batteries: 409 g
Operating modes: variable watt; Boosting; temperature control on nickel, titanium, stainless steel and TKS; customizable power supply schedule
Output power: 5 – 200 W
Maximum current output: 45A
Maximum output voltage: 12V
Supported resistance: 0.1 – 3 ohms
Power: 2 x 18650 batteries (adapters included)/20700/21700
Screen: 1.08″ color TFT
Operating temperature range: 0° – 45°С
Storage temperature: 20° – 60°С
Relative humidity: 45% – 75%
Protection: IP68 protocol
Charging port: USB Type-C
Top airflow with leak-proof design
Lock with a separate A-Lock button
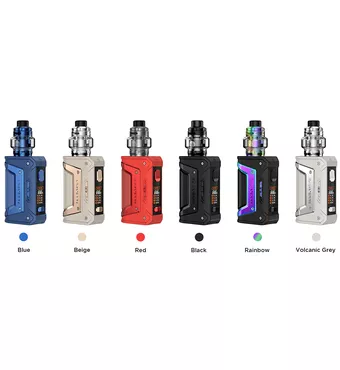
Colors: Blue, Beige, Red, Black, Rainbow, Volcanic Gray
Appearance and design of Geekvape Z Max Tank
The atomizer called Z Max Tank, also known as Zeus Max Tank, is an updated version of the maintenance-free Zeus of 2019. Although in fact it’s exactly the same “hello from the past.” Large, pot-bellied, with notches on the lid and base, engraving of Zeus the Thunderer on the evaporation chamber. The Atom holds a decent volume of liquid and runs on replaceable mesh evaporators. Geekvape even took the time to create new M Series Coils for it, which replaced Mesh Z1 and Mesh Z2 (these in turn became known as Z Series Coil). It is too early to say how widespread the tank and new evaporators will be, but this primarily depends on both demand and supply – if store owners decide that customers do not need the device, then we will not see either the tank or evaporators on the shelves of vape shops . However, a typical story.
The manufacturer has six tank design options: black, steel, gun metal, gold, blue and rainbow. Of these, only the gold one is not included with the mod; all the others come with devices of the corresponding color. Perhaps the “geeks” will stir up some limited “luxury” set, and we will see the gypsy L200 Classic Kit “in gold”.
Characteristics of Geekvape Z Max Tank
Height: 42.5 (without drip tip)/51 mm (with included drip tip)
Diameter: 26 mm (on landing) / 34.5 mm (with complete flask) / 32 mm (with spare flask)
Capacity: 6/4/2 ml
Drip tips used: 810
Top air intake, bottom airflow
Top filling
Evaporators used: M Series Coil:
0.2 Ohm (70 – 85 W)
0.3 Ohm (55-65 W)
0.14 Ohm (60 – 80 W)
0.15 Ohm (85 – 100 W)
Colors: Black, SS, Gun Metal, Gold Blue, Rainbow
Like other “Zeus”, no matter whether they are serviced by RTA or on evaporators, our atomizer is equipped with an upper air intake, i.e. AFC is located just under the gas filler cap. The ring is equipped with two wide holes for air intake, has stoppers in extreme positions, but you can also set intermediate ones. The part turns easily, as it is held on only by one thin oring (the ring can even be accidentally removed along with the filling cap). In my copy, the tuning also occurs with the melody of an ungreased door, that is, it naturally creaks. Although the ring itself does not come off when accidentally touched or during use, I would like it to be a little tighter.
On top is a standard 810 drip tip made of black Delrin, held in place by an oring located in the tank. There is another one in the set, exactly the same in appearance. I measured both of them with calipers from all sides, but I couldn’t find any differences. Why is it needed? I still don’t understand. It would be better if they offered some interesting alternative made of colored Resin. Or at least a slightly higher or lower option.
The filling cap is also made according to all the canons of the “Zeus”: the top one is held on a bayonet connection; to open it, you just need to turn it a third of a turn to get to the holes for the liquid located in the recess. Don’t get confused, you can’t pour liquid into the center where the evaporator is visible.
On the bottom plane of the tank you can find a bunch of engravings: another version of the device name Geekvape Z, standard pictograms, something similar to a serial number made of letters and numbers, and the standard Designed by Geekvape Made in China. The positive pin of the atomizer has a small contact area – much smaller than that of other atomizers. And although it is raised above the negative thread, I would not recommend using the tank on mech mods with a hybrid connector. Such a pin will simply push through the contacts of your batteries very quickly. The pin itself is “floating”, i.e. moves inside the insulator for better contact with the evaporator, which can be reached by unscrewing the bottom cover.
Complete 6 ml glass (on the tank, left) for Geekvape Z Max Tank and spare 4 ml
Here you can access the flask. The “bellied” glass initially installed on the Z Max Tank allows you to inject up to 6 ml. And although the spare one looks almost the same, but is actually 2.5 mm smaller in diameter in the place of the protruding “swell”, with it the atomizer capacity will be only 4 ml. In addition to these two, there is also straight glass, which is supplied with the “European” version of the set. Everything is very sad there – 2 ml and not a drop more, such are the strict requirements of TPD.
Removing the evaporator is quite simple, especially if you have a special device in the form of a wrench in your kit. As I already complained, I didn’t have it in the set, so I had to tear my claws and nails – even on my two orings the changer fits quite tightly. Here, under the lid, you can see narrow slots in the dome of the evaporation chamber, through which air from the air intake holes enters the atomizer base, and from here into the evaporator.
M Series Coil Vaporizers for Geekvape Z Max Tank
M Series Coils designed for the Z Max Tank are (for now?) exclusive to this tank. And, as Geekvape writes, they are intended “exclusively for lovers of big and tasty clouds.” As I wrote above, they replaced Mesh Z1 and Mesh Z2, which are very similar in appearance. Included with the kit you can find two at once: one is installed in the tank, the second is hidden in a small box with the rest of the extras.
Winding inside M Series Coil evaporators
You can find four versions of these evaporators on sale. All of them are low-resistance, each contains a natural cotton wick and can have from one to four vertical windings on a KA1 Kanthal mesh:
Geekvape M Series Coil Vaporizers
The evaporator installed in the tank is 0.14 Ohm, (recommended power is 60~80 W);
0.3 Ohm Dual (double wound, 55-65 W);
spare in the set – 0.2 Ohm Triple (triple, 70-85 W);
0.15 Ohm Quadra (quadruple, 85-100 W).
To install the evaporator, you don’t need any tools – just insert the replacement element like a cartridge into the holder until it stops. The main thing is to make sure that both orange orings are in place and the evaporator is fully inserted into the atomizer. We screw the base on top – if it screws on without any problems, then you have installed everything correctly.
There are no problems at all with refilling: we stick the bottle on top and fill the container, painstakingly squeezing the juice out of the hard jar. There will be no problems even if you are the owner of the liquid not in a standard gorilla, but in a Boston with a glass pipette or a jar with a Twist-top spout. Or even try to pour it straight from the throat – the holes are large, you can easily get in with a thin stream. But I wouldn’t recommend immediately pouring liquid to the very edge; I’ll explain why below.
After the first refueling, do not forget to wait a couple of minutes until the evaporator is saturated so that the winding does not warm up the first time you start it. My acquaintance with the tank did not work out from the very beginning. After five minutes, the evaporator was overfilled, liquid was gurgling inside, and with each puff, in addition to steam, I also received a portion of boiling water. What is the reason – I won’t undertake to say. The evaporator was installed correctly, the liquid with the classic composition 70VG/30PG was used. After disassembling, drying and refilling, nothing has changed. Either I got a defective 0.14 Ohm evaporator, or “something went wrong.” In any case, for me personally, Z Max Tank is nothing more than ballast for a mod that is much more interesting.
Appearance and design of Geekvape L200 Classic 200w (Aegis 2 Classic Mod)
Here I must admit that I am completely confused about all the nuances of the naming used in recent years by Geekvape. And Legend 2, and L200 Classic Mod, and Aegis Legend 2 Classic are all about the same thing. At the same time, on the box the device is simply called Mod, but on the device itself there is nothing except the name of the manufacturer. But in general, it is reminiscent of the first Aegis Legend model, which was released five years ago. At the same time, it is larger, taller and thicker than the L200 without the Classic annotation, powered by two 18650 batteries. Our ward uses 21700 format banks for power, and therefore not only looks a little different, but also larger.
I think that it is pointless to once again meticulously describe the appearance, which is already familiar to many. In the photographs you can see it from all sides. It’s the same case with a rubber coating, a painted plastic frame, a “leather” handle on the back with stitching, a Fire trigger button and brutal-looking mounting screws.
The entire upper area, including the space around the connector, is absolutely flat, with a rough texture and painted. In my opinion, it’s completely in vain, since such a coating will probably get scratches from atomizers over time. The positive pin is spring-loaded, has a good power reserve and easily “digests” not only the supplied tank, but also drip devices with significantly protruding positive contacts.
The width of the steel platform is 27.7 mm, and if we also take into account the “rubber” around the perimeter – 32.5 mm. This space is enough for almost any steam generating monster you want to wind up here. Well, except for very rare wonders like the Aromamizer Ragnar ∅35 mm or Titan ∅41 mm. Personally, the only thing that bothers me is that the rubber covering is not fixed in the area of the site and easily moves away from it. True, there is no gap deeper than a couple of millimeters and everything is quite tight, but the existing gap raises certain concerns that liquid and dust will get into it and remain there.
The battery compartment cover has not undergone any fundamental changes. It is held in place by a hinge and secured with a sliding latch, with a spring that tilts the lid when opened. On the inside there is a marking for installing batteries, inside the mod itself there are spring-loaded contacts, and the polarity is also indicated there. The main thing is not to forget to look where the “+” is and where the “-” is, although the board is protected from polarity reversal. Judging by the small spring-loaded contact sticking out under the cover, there is also a charge balancer. The only complaint I have about the lid is that it is not always possible to close the lid the first time, the springs are very tight. Well, and, as a result, the same tight latch button, which is very difficult to move.
The device is capable of running on both capacious and powerful batteries used for vaping, 21700, and the good old 18650. For the latter, the kit even includes two adapters in the form of plastic tubes. You can put 20700 here if you have a couple. Despite their smaller diameter, the contact springs will not allow even them to dangle inside the battery compartment.
Charging port for Geekvape L200 Aegis Legend 2 Classic mod
The real challenge for me was finding a charging port. At some point, I even decided that it wasn’t there (only weaklings read instructions!), and the cable was put in the kit for fun. But after turning the device in my hands, I finally found the treasured plug covering the connector: to get to the hidden USB Type-C, you need to pick up the elastic band with your fingernail just above the screen. The manufacturer writes in the instructions about the possibility of updating the board’s software, but on the download page on the Geekvape website for the L200 Classic there is nothing except a description of the characteristics, instructions and a certificate of compliance with TPD standards.
Charging mod Geekvape L200 Aegis Legend 2 Classic
The device is capable of charging with a current of 5V/2A, for which the manufacturer can be praised. True, with a battery capacity of 21700, this will take more than one hour. At the same time, do not forget that the batteries will heat up at such currents, and in a confined space without ventilation, protected from dust and moisture, this is a rather controversial entertainment. Therefore, I would still advise using an external charger, and I treated the possibility of using the port in the L200 Classic Mod as a “possibility”. You never know, it’s not worth adding to the sad statistics with exploding devices. And under no circumstances leave the device with the cable connected for a long time unattended.
Screen and controls Geekvape L200 Classic Mod
The device uses a standard three-button control scheme: a wide Fire button is located above the screen, at the bottom there is a double “-”/“+” button, divided in the center by a lightning bolt with the manufacturer’s logo. All buttons are pressed with a quiet but distinct click, do not dangle, do not rattle, and do not “jingle” under your fingers. Hidden behind a blacked-out panel that covers most of the front of the mod is a 1.08″ (2.75 cm) diagonal TFT color screen. In bright light the image is expectedly dim, in direct sunlight it is almost unreadable. Otherwise, the display is already familiar from other Geekvape devices.
A-Lock switch mod Geekvape L200 Aegis Legend 2 Classic in an unlocked state A-Lock switch mod Geekvape L200 Aegis Legend 2 Classic in a locked state
On the left side there is another control – A-Lock. This is no longer a button, but a switch that allows you to block all control buttons, including Fire, with one movement. This element has appeared in many of the company’s products quite a long time ago and, judging by the reviews, is popular – you don’t have to remember any special combination of buttons to lock the device before putting it in your bag or backpack.
The device turns on when the batteries are installed; you can turn off and then turn on the board again by pressing the Fire button five times. Or simply lock it with the A-Lock switch described above. The screen simultaneously displays the name of the selected mode, icons of the charge of each battery, the installed power or temperature, a little to the right is the button lock icon, below is the winding resistance and additional operating parameters: resistance, current output and voltage (in vari-watt mode), power and TCR (in temperature control mode), as well as a puff counter. The power changes from 5 to 100 Watts in 0.5 Watt increments, higher – 1 Watt increments, fast rewinding, and circular scrolling. To enter setup mode, you need to press Fire three times.
Everything is simple here: depending on what is highlighted in color, you can switch it using the “-”/“+” buttons. If the top line is the modes change, if the line is opposite the Ω icon, you can lock the resistance (the icon will change to a “lock”), if it’s opposite W in thermal control mode, you can adjust the power, if opposite C, the puff counter is reset. Confirm your choice by long pressing Fire. Or if you don’t press anything for a couple of seconds, the board exits setup mode.
In total, the following modes are available to the user:
POWER – variable watt mode, power varies from 5 to 200 W.
BOOSTING – a mode that emulates the operation of a mechanical mod (bypass).
TC-NI, TC-TI, TC-SS – thermal control modes for nickel, titanium and stainless steel, respectively. Temperature ranges from 100° to 315° (1°C increments) Celsius and 200° to 600° (5°F increments) Fahrenheit. Here you can set the power limit from 5 to 200 W, but you cannot set the set temperature coefficients, but you can see them.
TC-TCR – thermal control with manual setting of TCR, the coefficient can be changed from “0010” to “5000”.
VPC – setting a power supply schedule of five segments, each 1 second.
Display Geekvape L200 Aegis Legend 2 Classic
The L200 Classic mod allows you to adjust the brightness of the display: in standby mode, you need to press Fire and “+”, a sun and percentages will appear, and by holding Fire, you can use the “-” and “+” buttons to select a comfortable value. In addition, there are some other functions called by different keyboard shortcuts. For example, when you press all three buttons, the device will switch to stealth mode and turn off in the same way. To find out the hardware and firmware version, you need to turn off the device by pressing Fire five times, and then hold down “-” and “+” for two seconds. You can immediately reset the settings to default: you need to press all three buttons for three seconds. You can also change the color scheme of the display: in the setup mode (three times on Fire), press “-” and “+” at the same time and wait until the option we like appears.
Impressions and conclusions
Despite the complaints expressed about some of the features of the device, I was frankly pleased with the device. Not only because someone else produces “classics” in the form of a box with replaceable batteries. The L200 Classic has excellent build quality, a familiar, attractive appearance, good functionality (this time I won’t complain about the lack of varivolt, I won’t wait), a protected body, a long operating time (it all depends on your batteries) and high power. I’ll say right away that despite the stated “ceiling” of 45 A and the lower resistance threshold of 0.1 Ohm, you still shouldn’t expect power from the device like a mechanical mod. Therefore, the Z Max Tank kit with its powerful vaporizers will be a godsend for someone who does not have a serviceable atomizer.
Size comparison (from left to right): Geekvape L200 Aegis Legend 2 Classic, Geekvape Aegis E100, Vert 2 mech mod with Kennedy 28mm RDA, Dotmod dotAIO V2
Size comparison (from left to right): Geekvape L200 Aegis Legend 2 Classic, Geekvape Aegis E100, Vert 2 mech mod with Kennedy 28mm RDA, Dotmod dotAIO V2
Today, the device has practically no competitors, although the demand for such box mods is small, but still remains. It’s nice that the price for the L200 Classic Kit on the Internet is not at all astronomical. Moreover, often it is for a set with a complete tank.